Title Bar and Main Toolbar

Contents
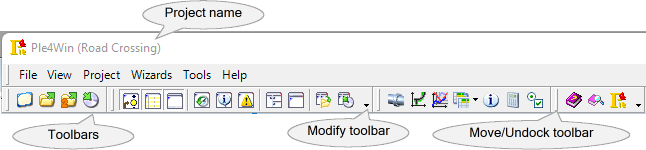
The window title bar at the top of the Ple4Win main window is showing the program name and the name of the project database currently in use (if any). Below it the main toolbars are located, which allow access to all functions of the program.
Note that all functions can be accessed through the top text-based toolbar (the menus). Frequently used functions are also accessible through the buttons located on the icon-based toolbars below the menus.
Note further that any of the toolbars can be moved around and (un)docked by click-and-drag on its corresponding ![]() icon. All toolbars can also be modified by either right-clicking anywhere on any of the toolbars or by clicking on one of the
icon. All toolbars can also be modified by either right-clicking anywhere on any of the toolbars or by clicking on one of the ![]() icons.
icons.
Below is a screen capture of the main window title bars.
For information on menu items and icons, see the list below.
Menu items
File menu items: |
|
|
Open a file dialog to create a new, empty project database. |
|
Open a file dialog to select an existing project database (*.plex). |
|
Opens a file dialog to select an existing project database as secondary database. |
|
Save the current project database. |
|
Open a file dialog to save the current project database under a new name or at a different location. |
|
|
|
Copy data from the secondary database into the current project database. A selection can be made which part of the database is to be copied. Only available if a secondary database has been opened. |
|
Copy all input data of the currently active design function from the secondary database into the current project database. Data already existing in the project database is not overwritten. Only available if a secondary database has been opened. |
|
Import input data from an Excel file into the current project database. Existing data in input tables will be overwritten unless the input tables are locked. |
|
Import input data from a Piping Component File (*.pcf) into the current project database. Existing data in input tables will be overwritten unless the input tables are locked. |
|
Import input data from multiple Piping Component Files (*.pcf) into the current project database. Existing data in input tables will be overwritten unless the input tables are locked. This option is useful for (large) projects that are divided into several files. |
|
|
|
Export multiple data tables from current project database into a single Excel file. Each data table exported from Ple4Win can be found as a table in an individual worksheet in the Excel file. |
|
Create an (empty) Excel file that can be used to import input data into Ple4Win. |
|
Export multiple data tables with comparison data between the primary and secondary databases. |
|
Set printing options. |
|
Display a visual representation of what the document will look like when printed, allowing to check for formatting errors, page layout issues, and other problems before actually printing. |
|
|
|
Print data in currently active workspace panel. |
|
Print multiple data tables. |
|
Close active project without closing Ple4Win. |
|
|
|
Display the names of the most recently used projects. The number of projects listed here can be changed in the Ple4Win Options. |
|
|
|
End program. |
View menu items: |
|
|
Show / hide the roadmap panel. |
|
Show / hide the function overview panel. |
|
Show / hide the workspace panel. |
|
|
|
Show / hide the roadmap legend |
|
Show / hide the messages panel |
|
Show / hide the project history table. |
|
Show / hide the program and project status table. |
|
Show / hide the messages, warnings and errors table. |
|
Rearrange and show all panels in the default layout. |
|
Rearrange and unpin all panels in such a way that the size of the workspace panel is maximised. |
|
Load a previously saved panels layout and applies it. |
|
Save the current panels layout to file. Any previously saved layout will be overwritten. |
Project menu items: |
|
|
Switch to Design Function 1 (Project Definition). |
|
Switch to Design Function 2 (Pipeline Configuration). |
|
Switch to Design Function 3.1 (Pipe Data). |
|
Switch to Design Function 3.2 (Soil Data). |
|
Switch to Design Function 3.3 (Model Boundary). |
|
Switch to Design Function 4.1 (Wave/Current Loading). |
|
Switch to Design Function 4.2 (Pipeline Loading). |
|
Switch to Design Function 5 (Pipeline Behaviour). |
|
Switch to Design Function 6.1 (Cross-Section Data). |
|
Switch to Design Function 6.2 (Cross-Section Behaviour). |
|
Process all design functions until finished or encountered an error. |
Wizards: |
|
|
Starts the Soil Model Wizard. |
Tools menu items: |
|
|
This functionality will display the configuration in 3D as a greyed pipeline. The configuration can be zoomed in and out, panned in any direction and rotated in any direction as well. |
|
Show a schematically drawing of the pipeline defined in the workspace panel. Depending on how far the project has been processed, additional information such as the displaced pipeline are also available. |
|
Show the multi graph data in the overview panel. |
|
|
|
Print multiple data tables. |
|
Export multiple data tables from current project database into a single Excel file. Each data table exported from Ple4Win can be found as a table in an individual worksheet in the Excel file. |
|
Export multiple data tables from current project database into a single Excel file. Each data table exported from Ple4Win can be found as a table in an individual worksheet in the Excel file. |
|
Import input data from an Excel file into the current project database. Existing data in input tables will be overwritten unless the input tables are locked. |
|
Create an (empty) Excel file that can be used to import input data into Ple4Win. |
|
Show the Ple4Win options and settings window. |
Help menu items: |
|
|
Show the contents-page of this help. |
|
Show the search-page of this help. |
|
Show the Hardware Key help (only available in Ple4Win Professional). |
|
Opens a browser window to http://www.Ple4Win.com |
|
|
|
Show an informational window about Ple4Win. |
ToolbarMain (last modified: Apr 11, 2025)
See also: